Tuesday, August 7, 2012

Homemade Calzones


Pizza Hut ain't got nothing on me!
This was the first time I made this delish dish and it turned out fabuloussss
It was so easy and beat the hell out of store bought pizza.
Its even better as leftovers :)

The tasty pizza dough
ingredients:
2 1/2 to 3 cups flour
1 tablespoon sugar
1 teaspoon salt

1 package (2 1/4 teaspoons) yeast
3 tablespoons olive or vegetable oil
1 cup very warm water


directions:
Combine yeast, sugar, 1 cup of the flour, and salt in a large bowl.

Add the warm water and oil, then mix.

Stir in remaining flour slowly until dough is soft and not too sticky.

Knead until smooth.

 Let the dough rest for at least 30 minutes before making the calzone.

The yummy calzone
ingredients:
pizza sauce
cheese
toppings (pepperoni, sausange, olives, mushrooms, peppers, onion, etccccc.)

directions:
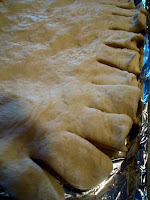
Once the dough has sat long enough, roll/pat the dough into a rectangle the length of your baking sheet. It can be wider than the sheet because you will be folding the sides in. Place the dough on the baking sheet and let the sides hang off if needed.

Cut the dough on the sides at about 3/4 inch intervals.

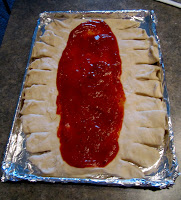
Then put the pizza sauce in the center of the dough.
(I used Ragu Homemade Style Pizza Sauce)
Next, you can add all of your favorite toppings! Being Miss Picky, I just added sausage.
Then comes the best part... the cheese! I added lots and lots of Mozzarella.
Now, start at the bottom and alternating sides, overlap the strips of dough onto the filling in a lattice pattern. You can stretch the pieces to fit all the way over the filling.

Bake your calzone at 375° F (190° C) for about 25-30 minutes.
Once it's cool, cut the calzone into slices.
All the goodies are sealed inside the bread. Portable delicious pizza! 


Pin It Now!

Monday, July 30, 2012

DIY Mario & Luigi Costume

Ask any college student what their favorite holiday to celebrate on campus is and they will most likely reply with Halloween! It’s not about getting gobs of the best candy anymore. Being in college requires a whole new level of Halloween spirit. When it comes to the costume aspect, no one says it better than my favorite mean girl.
"Halloween is the one night a year when girls can dress like a total slut and no other girls can say anything about it."
 So throw on that be-dazzled bra and a set of animal ears and own it!
Me on the other hand decided to tone it down a bit in my first college Halloween party debut. Not to mention getting the boyfriend to dress up in something crazy was next to impossible! This easy (& fairly cheap) DIY halloween costume was a total hit & showed just enough skin to fit in with the other girls
My skirt, shirt, and heels were things I had in my closet. I picked up white gloves, suspenders, & white stockings at Party City. The Mario hat was the only item I had to "splurge" on. It was 22 bucks.

The great thing about this costume is that it can be so versatile!
You could wear shorts/jeans/overalls instead of a skirt.
Buy a red hat and paint a big white M on it.
This could be a couples or all girls/boys costume.
You could also get a big group and throw in the other characters.
(Princess Peach, Toad, Yoshi, Bowser, or Donkey Kong)
The options are endless!

If you're hopelessly stuck on a costume decision like I was I hope this easy DIY helped! :)
Pin It Now!

Tuesday, June 5, 2012

DIY Felt Flower Pillow

I spotted a cute pillow tutorial a couple months ago while surfing Pinterest. The only problem with this craft was that I didn't have a sewing machine. Luckily, my mom had gotten a Kenmore when she got married and now it was mine! :) 
Best gift EVER

After much confusion and reading the entire manual, I was ready to get my sew on!
This was the final product :)


What you will need:
1/2 yard of fabric
6 sheets of felt

I began by measuring out 2 18 1/2 by 18 1/2 inch blocks of fabric.


I then found two different sized circles (a can & a cup) and traced a total of 50 circles.
20 of the smaller can & 30 of the larger cup
The can was around 2 1/2 inches across and the cup was about 3 1/2 inches across


Once the circles were cut out, I cut them all in half.
In the middle of one of the blocks of fabric, I traced a large plate.
I began sewing the larger half circles in layers around the traced circle and then moved inward.


Once I completed 6 rows, I moved onto the smaller circles.
After completing about 3 rows, I realized that I was going to have to trim down the smaller half circles to get the look I was hoping for.


 The circles at this time were also getting REALLY difficult to sew so I decided to begin hand sewing. After I added about 3 rows of the smallest half circles, all I had left to do was the middle. I eyed out about a 2 inch circle. I then cut little slits all around the outside edge. I used my needle and sewed the circle right smack dab in the middle of the pillow. This created the look I was hoping for!


Your flower should now be complete! All thats left to do it sew the actual pillow.


This easy idea is a great way to freshen up a room. It also helped me give new life to an old pillow!
Pin It Now!

Saturday, June 2, 2012

DIY Chic Kitty Bowls

I am very pleased to announce a new addition to my wittle family of myself and boyfriend of 3 years, Ryan. Everyone meet Harlow :)

I've been searching for the perfect kitten for over 3 months now and finally found her.  Can't wait to spoil her in every way possible.
While scrolling through countless pages on Pinterest, I came across some DIY pet bowls from http://www.urbanejane.com/2012/03/super-bowl-sunday-canine-style.html that fit the vibe of my kitchen perfectly. Not only are they adorable, they were a piece of cake to make (and they meant another trip to Hobby Lobby a.k.a. HEAVEN ON EARTH yay!)


I purchased two of these lovely glass candlesticks for only $2.99!
Glass Taper Holder & Candlestick
I then made my way up the road to Wal Mart and purchased two different sized silver pet bowls for a whopping 99 cents.


My craft night bff Vivian had some left over tiffany blue paint so I used that to hand paint the candlesticks. When the paint dried, I hot glued the bowls to the candlesticks. After a night of drying I had completed my chic kitty bowls for under 10 bucks.
If thats not a successful DIY, I don't know what is!
Pin It Now!

Wednesday, May 30, 2012

DIY Party Cup


Ready to get rid of those red solo cups and party in style?!
Not only is this upgrade chic, it will save you money!
No more buying entire packs of cups just to use one and throw it away.
  
Heres what you'll need:
Oversized glass cup
Glass paint
Pearl/Jewel stickers
I was able to buy all of my supplies at Michaels!
I grabbed an oversized margarita glass, two bottles of Martha Stewart Multi-Surface Acrylic Craft Paint (Acorn & Beetle Black), and a sheet of Martha Stewart Pearl Stickers. 
I found this simple leopard pattern on google and tried to somewhat follow the shapes.
I began by free handing the brown shapes onto the entire glass. I decided to go back  over the shapes after the first coat dried because as you can see, it was pretty streaky.


I then went back and blotted/stippled the black paint in random spots and shapes.

After I let the cup dry for awhile, I tried to stick on the pearl stickers.
Unfortunately, they didn't stick AT ALL so I had to hot glue them on.


This extremly simple yet adorable craft only cost me $14.00 and will probably save me money in the long run!
Hope you enjoyed :)

Pin It Now!

Saturday, May 12, 2012

DIY Chevron Sneakers


I don't know if it's just me... but I am OBSESSED with chevron. Chevron curtains, chevron rugs, chevron clothes, chevron... well you get the picture. Vivian and I decided one craft day (yes we have started comitting entire days to our crafting addiction) that we were going to express our love for chevron on some hideous white kicks from Target.
Here is our lovely before picture..


and after 2 hours of hard work and several hand cramps later, my after :)


I can't tell you how many times someone has asked me where I bought them! Love the feeling of a successful DIY :)

What you'll need:
Any pair of old/new white sneakers
Fabric markers or Sharpies
A chevron template

When I said hideous.. I wasn't kidding. They don't call them the "Olga Sneaker" for nothing.
Got these winners at Target for $12.99

Womens Mossimo Supply Co. Olga Canvas Flat Sneakers - White
Hobby Lobby has a ton of fabric markers to choose from. I decided on FabricMate Chisel tip. I purchased mist grey, neon orange, strawberry, and turquoise.
WARNING: These particular fabric markers bleed really bad... when drawing your stripes leave a little bit of white space inbetween to give it room to bleed.


As I mentioned in my sunburst spoon mirror tutorial, I'm kind of a perfectionist so I used a template for most of my shoes but Vivian winged her and they still came out lookin' awesome. I simply looked up chevron template on google. I then copy and pasted it to Microsoft Word and messed with the size until I found the perfect one! When I wanted a smaller or bigger stripe than the others, I just scooted the template over a little bit more. Worked like a charm :)


Thanks for checkin' out my blog.
 I would LOVE to see how your kicks turned out!
Pin It Now!

Wednesday, May 9, 2012

DIY Sunburst Spoon Mirror


 I have always been fond of sunburst mirrors, but not too fond of the store bought prices. So I decided to surf good ole google for some inspiration. I finally came across the perfect one. I found this lovely idea and "how to" tutorial from http://www.addicted2decorating.com/how-to-make-a-decorative-chrysanthemum-mirror.html.

I began this project with a trip to Hobby Lobby. As ususal, I went there to buy a mirror for the center of my sunburst mirror and ended up coming home with a bag full of goodies. I purchased the Decorative Round Mirror Plate located in the candle isle.  This mirror has a beveled edge and measures 13".

Decorative Round Mirror Plate

I then made my way to the paint isle and decided on Krylon Blue Ocean Indoor/Outdoor Spray Paint. Finally, I purchased a large piece of foam board to hot glue my spoons on to. After my visit to Hobby Lobby, I then made my way to The Dollar Tree. Because I didn't realize how many spoons I would need I only bought 4 packages of 48 spoons. To save you the 3 seperate trips I ended up taking, I would buy around 14-15 packages depending on the size of mirror you are wanting to make. Unlike my inspiration that only had around 7 layers of spoons, my mirror ended up having 11 rows.
So without further delay, here is my personal tutorial for a DIY sunburst spoon mirror.

Supplies:
1 large piece of foam board
1 large circular mirror
Hot glue gun and glue sticks
15 (48 count) packages of plastic spoons
1 can of Ocean Blue Krylon spray paint

1. I began by placing my mirror in the middle of the foam board. I carefully traced around the outside. After this step I measured 9 inches out from the circle I had traced and placed a mark. I continued to do this a few inches apart around the entire mirror. I then used an exacto knife to cut the circular shape of the mirror by connecting the marks I had made. (Do not worry if your circle is not perfect because the spoons will cover it up!) I cut out the center of my circle but I would suggest to leave it there. The hole made it difficult to hot glue the mirror on at the end.
2. I then snapped off all of the tops of my spoons. Once that was complete, I glued by first spoon on to my foam board on the outter edge making sure to let it hang off. Because of my perfectionist tendenceys, I marked every two inches around the outside of the mirror gluing each spoon in the middle of that mark.


3. Once the outside row is complete, you can add your second row by simply gluing the spoons in between two of the spoons on the outer row. After completing the outer row, I did not mark anymore. It was fairly easy to eye where the spoon should be placed. Overlap your spoons just enough to cover the foam board, hot glue, and ends of the snapped spoons. Complete one row at a time until you reach the inner traced circle. DO NOT worry if the spoons begin to go directly in front of a spoon on the outer layers. Once the project is complete you cannot tell! Just remember it is important to keep them fairly inline with their neighbor spoons :)
This is my "craft night" bff Vivian :) Without her, this mirror would've taken a week to finish!

4. Once all the rows were complete, I spray painted the entire thing. Because my mirror was so large, I did not ombre the spoons. Once dried, I hot glued the mirror right where I had traced. I hung the sunburst mirror using 3M Command picture hanging strips.

Ta-Dah!
SO proud of my DIY sunburst mirror!
Let me know whatcha think and if you have any questions, ask away :)
Pin It Now!